
Recording vocals at the right level is mostly about leaving clean headroom. You want a healthy signal that stays comfortably above the room and equipment noise without getting close to digital clipping.
Key takeaways
- Set gain for the singer’s loudest realistic performance, not a quiet soundcheck.
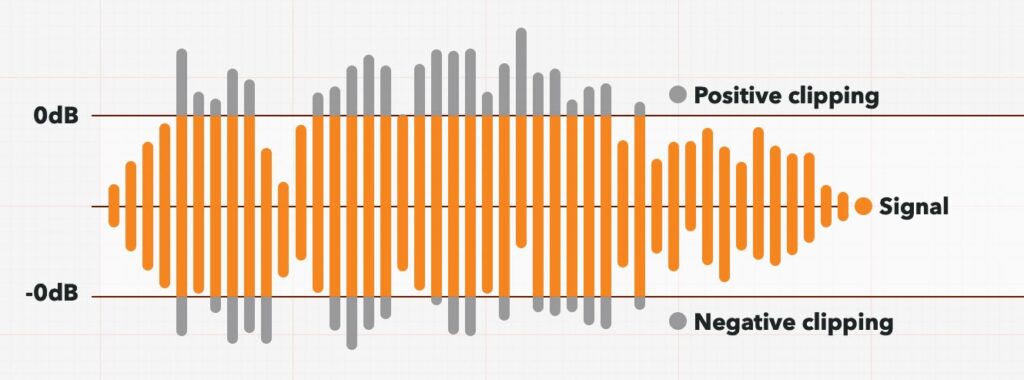
- Digital clipping cannot be repaired by lowering the track later.
- Microphone distance, room noise and performance consistency matter alongside meter level.
Related guides: How to Stop a Microphone Boom Stand From Falling Over Do You Need a Sound Card for Music Production?
Quick answer: When recording at 24-bit, aim for most vocal peaks to land between -12 and -6 dBFS. An average level around -18 dBFS is a useful starting point, but the exact average will change with the singer and the type of meter. Occasional quieter phrases can fall below -24 dBFS without causing a problem.
| Meter reading | Useful target | Why it matters |
|---|---|---|
| Loud vocal peaks | -12 to -6 dBFS | Leaves room for unexpected louder notes |
| Typical average | About -18 dBFS | A practical 24-bit gain-staging reference |
| Digital maximum | 0 dBFS | Anything that reaches or exceeds it clips |
| Recording format | 24-bit, 44.1 or 48 kHz | Provides ample dynamic range and practical file sizes |
These are starting points, not pass-or-fail limits. A soft singer may sit lower, while a very dynamic performance may need more headroom. The important rule is simple: record cleanly, never clip, and do not chase a waveform that looks artificially large.
Use dBFS—not dB SPL or LUFS—when setting the input
The label “dB” is incomplete by itself. Different audio measurements use different reference points:
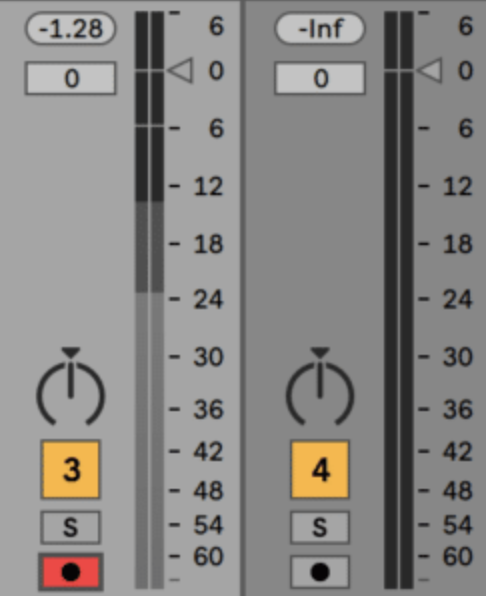
- dBFS (decibels relative to full scale) is the level shown by your DAW while recording digital audio. Its ceiling is 0 dBFS.
- dB SPL describes acoustic sound pressure in the room. It is useful for measuring monitoring volume or the loudness at the microphone, but it is not the meter you use to prevent digital clipping.
- LUFS estimates perceived loudness over time. It is mainly used when balancing and delivering a finished mix, not when choosing microphone preamp gain.
Adobe Audition’s meter documentation confirms that digital input meters use dBFS and that 0 dBFS is the maximum amplitude before clipping. Adobe also notes that a dBFS reading does not directly describe the acoustic sound-pressure level in the room.
How to set a vocal recording level
1. Record at 24-bit
Use 24-bit recording unless your hardware gives you a specific reason not to. Its wide dynamic range lets you leave plenty of headroom without increasing audible quantization noise. For most music sessions, either 44.1 kHz or 48 kHz is appropriate.
2. Check the dry input signal
Temporarily bypass plug-ins that change the recorded level. Reverb and delay are fine in the monitor mix if they help the singer perform, but they should not obscure what the dry input meter is doing. If you intentionally record through hardware compression, leave additional margin and make sure no stage in the chain clips.
3. Rehearse the loudest section
Ask the singer to perform the loudest chorus or highest sustained note at real performance intensity. A quiet “check one, two” is not representative of the take. Watch the peak meter while the microphone position and distance remain consistent.
4. Adjust the interface or preamp gain
Use the microphone preamp or audio-interface gain control to set the recorded level. A DAW channel fader usually changes monitoring or mix level after the signal has already been converted, so lowering that fader does not repair an overloaded preamp or converter. If you are unsure whether you need an interface, see our guide to soundcards and audio interfaces for music production.
5. Record and inspect a full test take
Record at least one complete verse and chorus. Check for overload lights on the microphone, preamp and interface as well as clipping in the DAW. Listen on headphones for crackles, distortion, room noise, excessive breath sounds and plosives. A meter can show level, but only listening can reveal whether the signal is usable.
Peak level versus average level
A vocal is dynamic. Consonants and transients may create short peaks while sustained notes sit much lower. That is why one number cannot describe every take.
Use the peak meter to protect against clipping. A target of -12 to -6 dBFS for the loudest expected notes leaves sensible headroom. Treat -18 dBFS as an approximate average reference rather than a requirement. RMS, VU and short-term loudness meters respond differently, so two meters can display different “average” readings for the same performance.
This range is a practical starting point rather than a technical standard. iZotope’s home-studio vocal guidance similarly recommends leaving headroom around -12 to -18 dB during gain staging and warns that a test peaking at -6 dB can leave too little margin when the singer becomes louder.
Why headroom is better than recording hot
Older recording systems had practical reasons to keep signals relatively hot. Modern 24-bit digital recording has enough dynamic range that you do not need to push every input toward 0 dBFS. Leaving headroom gives the performer space to become louder without ruining the take.
A clean take that peaks at -12 dBFS can be turned up later with no meaningful loss of quality in a normal home-studio workflow. A clipped take cannot be restored perfectly by turning it down.
Microphone distance changes the level and tone
Gain is only part of the setup. Start roughly 6 to 10 inches (15 to 25 cm) from a typical vocal microphone, use a pop filter, and adjust from there. Moving closer generally increases level, bass from proximity effect and sensitivity to plosives. Moving farther away captures more room sound and may require more preamp gain.
Keep the distance repeatable during the take. A singer can lean slightly away for a powerful note and return for quieter phrases, but large uncontrolled movements make the recording harder to balance. Route the cable so it does not pull the stand; our guide explains how to keep a microphone boom stand stable.
What if the recording is too quiet or noisy?
If a healthy vocal cannot reach useful levels without obvious hiss, do not simply keep increasing gain. Check the microphone type, cable, interface input, pad switch and room noise. Make sure a condenser microphone receives phantom power when required. A low-output dynamic microphone may need a cleaner preamp or an inline gain booster for quiet sources.
Also listen for computer fans, air conditioning, traffic and room reflections. Improving the signal at the source is more effective than trying to remove heavy noise later.
Common vocal-level mistakes
- Testing with a whisper: Set gain while the singer performs at realistic intensity.
- Aiming just below 0 dBFS: There is no sound-quality prize for a nearly clipped 24-bit recording.
- Watching only the DAW: The microphone, preamp or interface input can overload before the final meter.
- Using the channel fader as input gain: Set the signal before conversion with the preamp or interface control.
- Changing distance between takes: Inconsistent position changes both tone and level.
- Confusing recording level with final loudness: Streaming loudness and mastering targets come later.
Vocal recording level FAQ
Is -18 dBFS too quiet for vocals?
No. At 24-bit, an average around -18 dBFS is a practical starting point and leaves useful headroom. Judge the noise and clarity by listening, and keep the loudest peaks comfortably below 0 dBFS.
Can clipped vocals be fixed?
Specialized repair tools may reduce the audibility of mild clipping, but they cannot reliably reconstruct every lost peak. Re-recording is the best option whenever possible.
Should I normalize vocals before mixing?
Not automatically. Clip gain, region gain or a trim plug-in can place the vocal in a comfortable working range. Normalization is optional and does not replace proper gain staging, compression or automation.
Should vocals be recorded in mono or stereo?
A single vocal microphone normally creates a mono track. Stereo techniques are useful for choirs, room ambience and special effects. Learn more in our mono versus stereo recording guide.
The best vocal level is the one that captures the full performance cleanly. Record at 24-bit, rehearse the loudest section, aim for peaks around -12 to -6 dBFS, and leave enough headroom that the singer can perform without watching the meter.
Technical guidance reviewed: July 2026. The microphone, preamp and interface can overload before the DAW meter reaches 0 dBFS, so the equipment’s own indicators and documentation remain part of the check.